Live Streaming Setup Guide
Complete technical tutorial for audio and video live streaming configuration
What You'll Learn
- Setting up OBS Studio for video streaming (RTMP configuration)
- Configuring Mixxx for audio streaming (internet radio)
- VirtualDJ setup for audio and video broadcasting
- Optimal encoder settings for different scenarios
- Troubleshooting common streaming issues
- Multi-platform restreaming configuration
Part 1: OBS Studio Video Streaming Setup
OBS Studio is the industry-standard free software for live video streaming.
Step 1: Download & Install OBS Studio
- Visit Shoutcast Net Download Page or obsproject.com
- Download OBS Studio for your operating system (Windows, Mac, Linux)
- Run the installer and follow the setup wizard
- Launch OBS Studio
Step 2: Configure Streaming Settings
- Click Settings in the bottom-right corner
- Go to Stream tab
- Select Service: Custom
Your Streaming Server Details:
| SERVER URL: | rtmp://video.yourserver.com:1935/live |
| STREAM KEY: | your_stream_key_here |
- Paste your Server URL (RTMP URL provided by Shoutcast Net)
- Paste your Stream Key (unique key from your control panel)
- Click Apply
Step 3: Configure Video Output Settings
In Settings → Output tab:
720p HD Settings (Recommended)
- Output Mode: Simple
- Video Bitrate: 3000 kbps
- Encoder: Hardware (NVENC) or x264
- Audio Bitrate: 128 kbps
- Recording Quality: Same as stream
1080p Full HD Settings
- Output Mode: Simple
- Video Bitrate: 5000 kbps
- Encoder: Hardware (NVENC) recommended
- Audio Bitrate: 160 kbps
- Recording Quality: High Quality
In Settings → Video tab:
- Base Resolution: 1920x1080 (your monitor resolution)
- Output Resolution: 1280x720 or 1920x1080
- Downscale Filter: Lanczos (best quality)
- FPS: 30 (or 60 for fast-paced gaming)
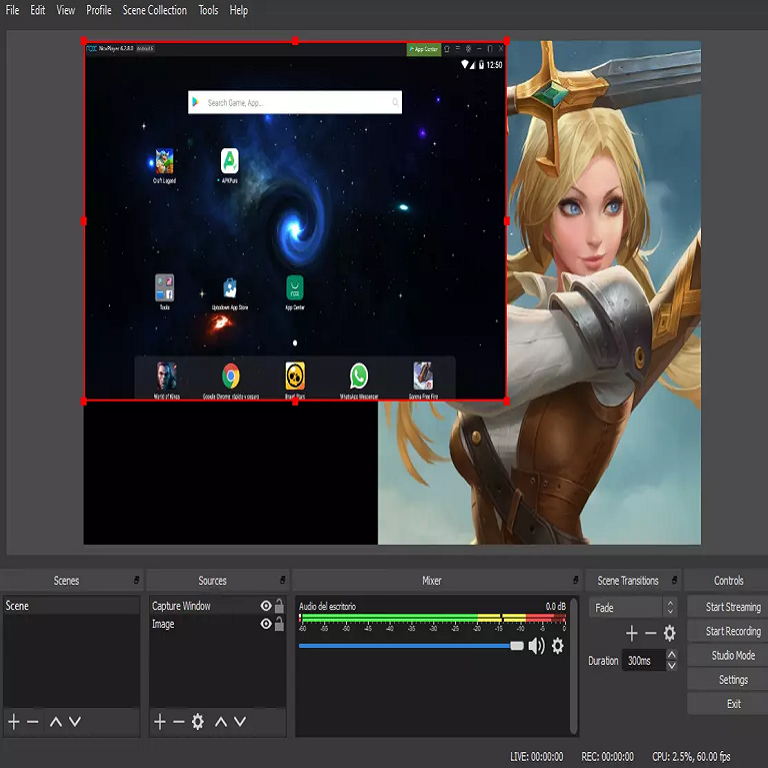
Step 4: Add Sources to Your Scene
- In the Sources panel, click the + button
- Add sources:
- Video Capture Device: Webcam or camera
- Display Capture: Screen sharing
- Game Capture: For gaming streams
- Audio Input Capture: Microphone
- Image: Logos, overlays, backgrounds
- Text: Stream titles, social media handles
- Arrange sources by dragging them in the scene preview
- Resize sources by dragging the red corners
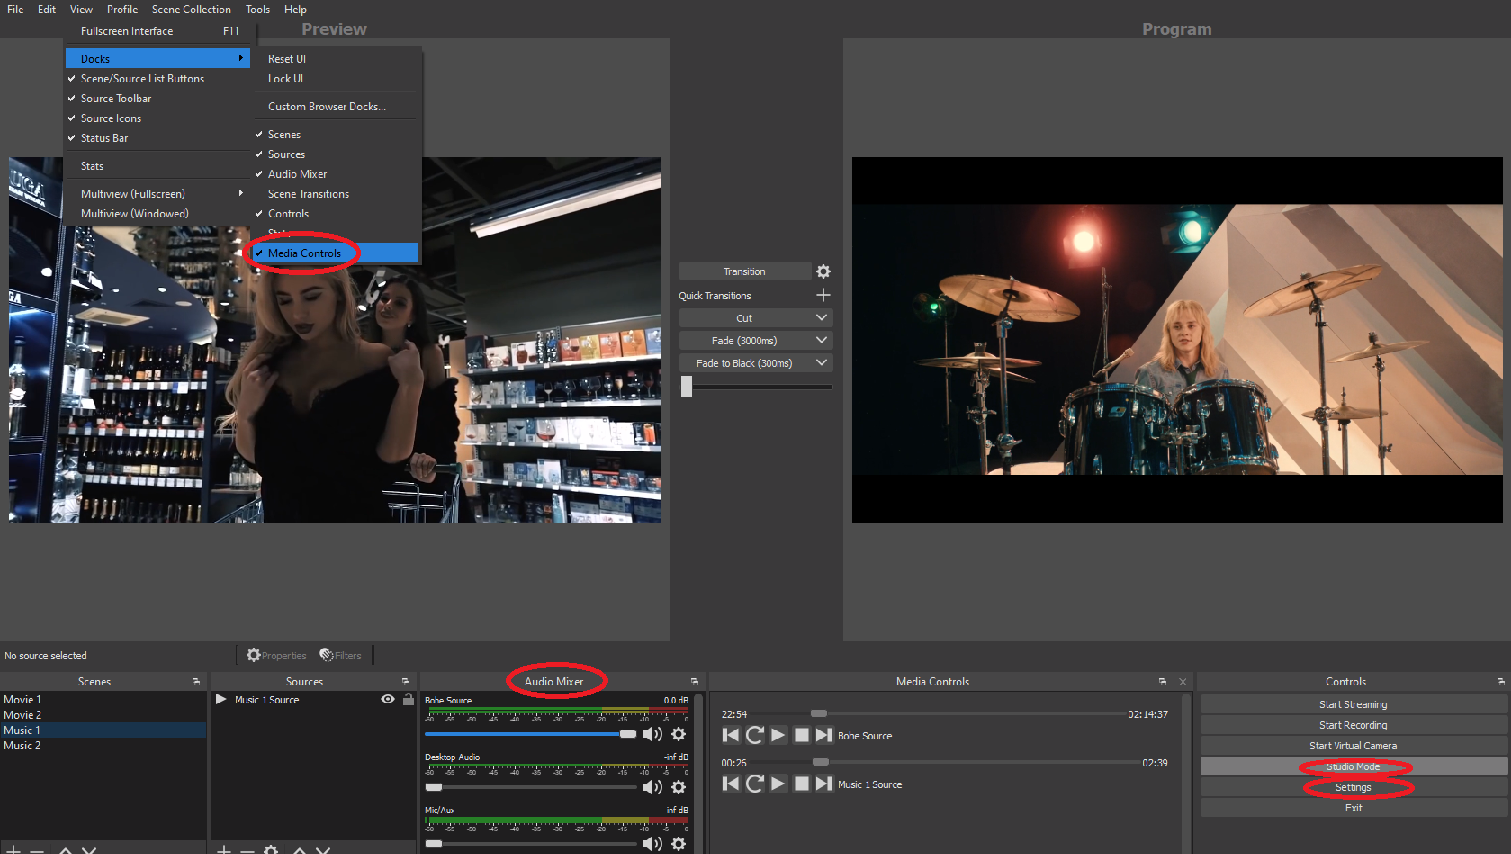
Step 5: Start Streaming
- Verify your scenes and sources are configured
- Check audio levels in the Audio Mixer panel (should peak around -6dB to -3dB)
- Click Start Streaming button in the bottom-right
- Monitor stream stats by clicking Stats in the View menu
- Watch for dropped frames (should be near 0%)
Watch Your Stream:
Web Browser:
https://video.yourserver.com/video/players/1935.php
You can also restream to YouTube, Facebook, Twitch simultaneously - configure in your control panel.
Part 2: Mixxx Audio Streaming Setup (Internet Radio)
Mixxx is free open-source DJ software perfect for live audio streaming.
Step 1: Download & Install Mixxx
- Visit Shoutcast Net Download Page or mixxx.org
- Download Mixxx for your operating system
- Install and launch Mixxx
Step 2: Configure Audio Hardware
- Click Options → Preferences
- Go to Sound Hardware tab
- Set Sample Rate: 48000 Hz
- Set Audio Buffer: 85.3 ms (adjust if you hear crackling)
- Select your audio device (built-in or USB audio interface)
Step 3: Configure Live Broadcasting
- In Preferences, go to Live Broadcasting tab
- Click Create New Connection
Your Audio Streaming Settings:
| TYPE: | Shoutcast 1 |
| HOST: | audio.yourserver.com |
| PORT: | 8000 |
| PASSWORD: | your_source_password |
| MOUNT: | (leave empty) |
| LOGIN: | (leave empty) |
| BITRATE: | 192 kbps (music) or 128 kbps (talk) |
| FORMAT: | MP3 |
| CHANNELS: | Stereo |
- Fill in the connection settings above
- Set Stream Name: Your station name
- Set Website: Your website URL
- Set Description: Brief station description
- Set Genre: Your music genre
- Click OK to save
Step 4: Start Broadcasting
- Load your music library into Mixxx (drag folders to library)
- Create a playlist or use Auto DJ feature
- Load tracks onto Deck 1 and Deck 2
- Click Options → Enable Live Broadcasting
- Press play on your deck to start streaming
- Mix and crossfade between tracks using the crossfader
Listen to Your Stream:
Web Browser (HTTPS - Recommended):
https://audio.yourserver.com:8004/stream
Virtual Worlds (HTTP - Second Life, Alife):
http://audio.yourserver.com:8000/stream
Pro Tip: Using AutoDJ
Want your station to broadcast 24/7 without keeping your computer on? Use the built-in AutoDJ feature in your Shoutcast Net control panel. Upload your music library to the server, configure playlists, and let it run automatically. Learn more about AutoDJ
Part 3: VirtualDJ Audio & Video Streaming
VirtualDJ Pro supports both audio and video streaming with professional features.
Step 1: Download & Install VirtualDJ
- Visit virtualdj.com
- Download VirtualDJ (free Home version or Pro license)
- Install and launch VirtualDJ
Audio Streaming Configuration
- Click the Settings icon (gear) in top-right
- Go to BROADCAST section
- Click AUDIO button
- Select Stream To: OTHER
Audio Streaming Settings:
| URL: | http://audio.yourserver.com:8000 |
| PASSWORD: | your_source_password |
| BITRATE: | 192 kbps |
| QUALITY: | Medium or High |
Video Streaming Configuration
- In Settings, go to BROADCAST section
- Click VIDEO button
- Select Stream To: OTHER
Video Streaming Settings:
| URL: | rtmp://video.yourserver.com:1935/live |
| STREAM KEY: | your_stream_key_here |
| QUALITY: | LOW (start here, increase after testing) |
| RESOLUTION: | 720p or 1080p |
- Fill in the connection details
- Click START BROADCAST
- Load video files to your decks and start playing
- If button changes to STOP BROADCAST, you're connected!
Important: Quality Settings
Always start with LOW quality settings and gradually increase. High quality requires significant upload bandwidth. Test your connection stability before increasing bitrate. Monitor for dropped frames or buffering issues.
Troubleshooting Common Issues
Problem: Can't Connect to Server
Solutions:
- Verify server URL/hostname is correct (no typos)
- Check port number (8000 for audio, 1935 for video)
- Confirm password is accurate (case-sensitive)
- Disable firewall temporarily to test
- Try using IP address instead of hostname
- Contact support if server is down
Problem: Stream Keeps Dropping/Buffering
Solutions:
- Test internet upload speed (must be 2x your bitrate)
- Lower video bitrate or resolution
- Switch to wired ethernet (avoid WiFi)
- Close bandwidth-heavy applications
- Change encoder preset to "faster" or "veryfast"
- Use hardware encoding (NVENC) instead of x264
- Check OBS Stats for network issues
Problem: No Audio in Stream
Solutions:
- Check if microphone is muted in OBS/Mixxx
- Verify audio device is selected correctly
- Check volume levels in Audio Mixer (should move with sound)
- Confirm audio bitrate is not 0
- Test audio source separately
- Restart encoder software
Problem: No Video in Stream
Solutions:
- Verify camera/source is not hidden in OBS
- Check if camera is being used by another app
- Update camera drivers
- Test camera in separate application first
- Try different USB port
- Restart OBS and reconnect camera
Problem: High Latency (Delay)
Solutions:
- Use RTMP for lower latency (vs HLS)
- Enable Low Latency mode in platform settings
- Reduce keyframe interval to 1-2 seconds
- Choose server closest to your location
- For ultra-low latency, consider WebRTC
- Note: HLS typically has 4-30 second delay (normal)
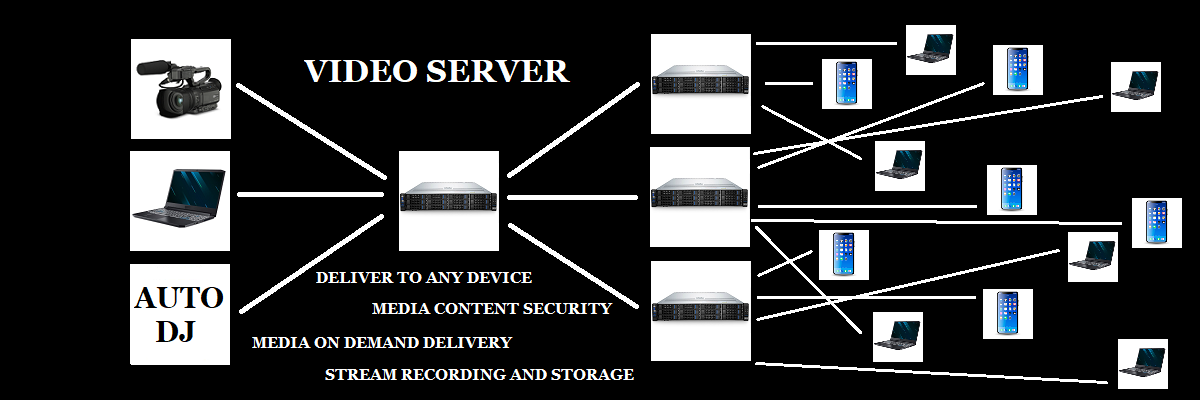
Advanced: Multi-Platform Restreaming
Broadcast to YouTube, Facebook, Twitch, and more platforms simultaneously.
Why Use Restreaming?
- Save Bandwidth: Stream once, reach multiple platforms
- Simplify Setup: One encoder connection instead of multiple
- Maximize Reach: Audience on YouTube + Twitch + Facebook simultaneously
- Professional Solution: Better than multi-output in OBS
Setup Instructions
- Configure your encoder (OBS/VirtualDJ) to stream to your Shoutcast Net restream server
- Login to your Shoutcast Net control panel
- Click EDIT button
- Add stream keys for each platform:
- YouTube: Get key from YouTube Studio → Go Live
- Facebook: Get key from Facebook Page → Live Video
- Twitch: Get key from Twitch Dashboard → Settings → Stream
- LinkedIn, Twitter, Instagram: Similar process
- Click EDIT SERVER to save
- Start your stream - it will broadcast to all configured platforms!
Learn More
For detailed multi-platform setup with platform-specific instructions, see our complete Video Restreaming Setup Guide.
Quick Reference: Optimal Settings
Audio Streaming
- Music Radio: 128-192 kbps MP3/AAC, 44.1 kHz, Stereo
- Talk/Podcast: 64-96 kbps AAC, 44.1 kHz, Mono
- Upload Speed: Minimum 2x your bitrate
- Encoder: Mixxx (free), VirtualDJ, BUTT
Video Streaming
- 720p: 2500-4000 kbps, 30 fps, H.264
- 1080p: 4500-6000 kbps, 30 fps, H.264
- Upload Speed: 1.5x bitrate + 20% headroom
- Encoder: OBS Studio (free), VirtualDJ Pro